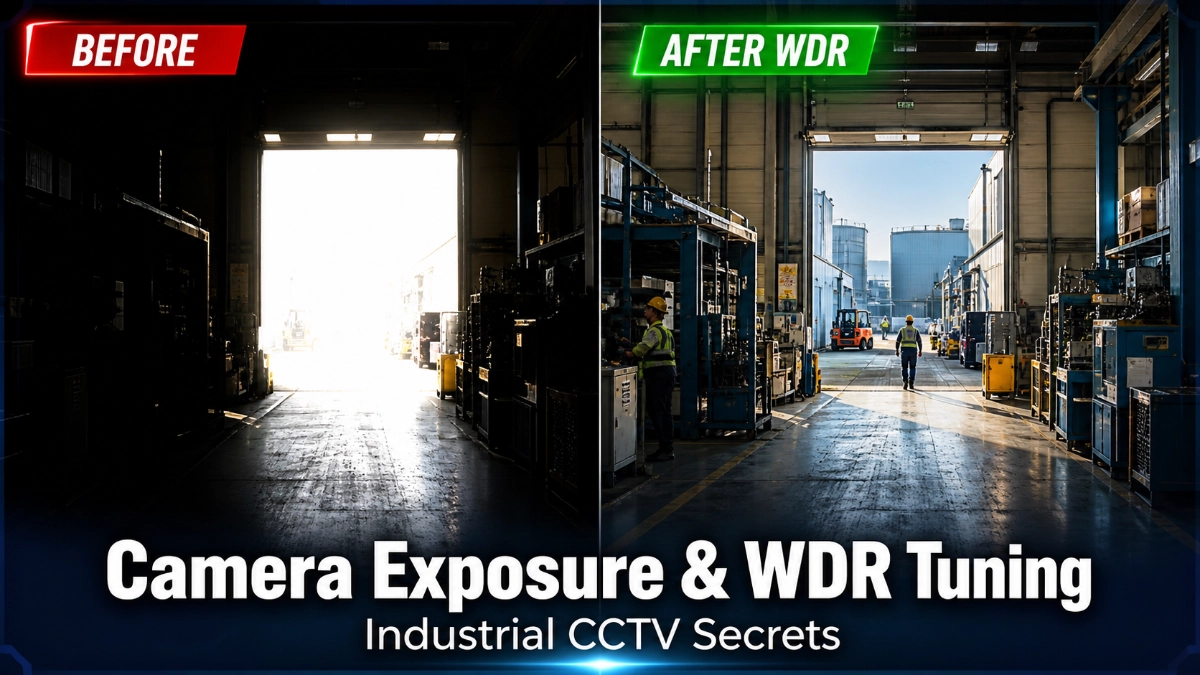
Imagine this: your industrial CCTV camera is pointed at a loading dock entrance. Outside, it’s blazing sunlight. Inside, it’s dim warehouse lighting. Your camera captures either a washed-out white exterior or a pitch-black interior, but never both clearly. This is the number one frustration engineers face in industrial surveillance. The solution? Understanding camera exposure and Wide Dynamic Range (WDR) tuning, and knowing how to apply them in real-world industrial environments.
Industrial settings are among the most challenging environments for any camera system. You’re dealing with welding arcs, mercury vapour lights, LED flicker, high-pressure sodium lamps, deep shadows, reflective metal surfaces and constant movement. Generic camera settings don’t cut it here.
This guide cuts through the theory and gives you practical, hands-on knowledge to configure cameras that actually work in factories, warehouses, oil and gas plants and outdoor industrial yards.
What Is Camera Exposure in CCTV? (And Why It Matters in Industry)
Camera exposure refers to the amount of light that reaches the camera sensor. Get it wrong, and your footage is either too bright (overexposed) or too dark (underexposed). In industrial settings, poor exposure means you miss critical details of a safety incident, a theft, or a process failure.
There are three core exposure parameters every engineer must understand:
1. Shutter Speed
Shutter speed controls how long the camera sensor is exposed to light. A fast shutter speed (e.g., 1/1000s) freezes motion but lets in less light, great for fast-moving conveyor belts but problematic in dim areas. A slow shutter speed (e.g., 1/25s) lets in more light but can create motion blur on moving objects.
Pro Tip: In environments with fluorescent or LED lighting running at 50Hz or 60Hz AC frequency, set your shutter speed to a multiple of your local power frequency (e.g., 1/50s or 1/100s for 50Hz regions). This eliminates the dreaded flicker band that ruins footage.
2. Gain (ISO Sensitivity)
Gain amplifies the camera sensor’s signal in low-light conditions, similar to ISO in a DSLR camera. Higher gain brightens the image but also introduces digital noise (graininess), making it harder to read license plates or identify faces.
In industrial cameras, gain typically ranges from 0dB (minimum) to 30dB or higher. The sweet spot depends on your lighting environment. Most industrial cameras allow auto-gain with a configurable maximum limit. Use this to cap noise at an acceptable level.
3. Aperture (Iris)
Aperture controls the size of the lens opening. A wider aperture (lower f-number) lets in more light, essential for dark areas like underground storage or poorly lit machinery zones. A narrower aperture improves depth of field, keeping both foreground and background in focus.
Many industrial cameras use motorised auto-iris lenses that adjust automatically. For fixed environments with predictable lighting, a manual iris set once correctly is often more reliable.
| Definition: Camera Exposure in CCTV Camera exposure in CCTV is the process of controlling how much light the camera sensor receives via three mechanisms: shutter speed (duration), gain (amplification) and aperture (opening size). Correct exposure ensures footage is neither washed out nor too dark, making it usable for identification, analysis and safety monitoring. |
What Are the Unique Lighting Challenges in Industrial Environments?
Industrial environments are a camera’s worst nightmare. Unlike a clean office or retail setting, factories and plants throw every possible lighting curveball at your surveillance system.
High Contrast Scenes
A camera monitoring a machine entrance may face a brightly lit exterior through a large door while the interior is dark. The contrast ratio can exceed 10,000:1, far beyond what a standard camera can handle in a single frame.
Backlight and Glare
Welding operations emit intense UV and visible light bursts. Sunlight streaming through skylights or open bays creates severe backlight. Reflective surfaces like metal machinery, polished floors and glass panels bounce light unpredictably.
Artificial Lighting Flicker
Many industrial facilities use fluorescent, mercury vapour, or certain LED lights that flicker at 100Hz or 120Hz (double the AC frequency). When the camera’s shutter speed doesn’t sync with this flicker, you get banding artefacts, horizontal dark bands rolling through the image.
Low-Light Zones
Warehouses, underground tunnels, nighttime outdoor yards and storage bays often have minimal lighting. Cameras must squeeze every bit of usable light from the scene without creating excessive noise.
Mixed Lighting Types
A single camera field of view might capture daylight, fluorescent tubes, high-pressure sodium lamps and LED strips simultaneously, each with different colour temperatures and flicker rates. This confuses auto white balance and exposure systems alike.
| Definition: Industrial Lighting Challenges Industrial lighting challenges refer to the complex mix of lighting conditions in manufacturing, logistics, and energy production environments, including extreme brightness contrasts, artificial light flicker, glare from reflective surfaces and mixed light source types. These conditions make standard camera configurations inadequate for reliable surveillance. |
What Is WDR in Industrial CCTV? A Clear Explanation
Wide Dynamic Range (WDR) is a camera technology designed to capture clear details in both very bright and very dark areas of the same image, simultaneously. Without WDR, you must choose: either expose for the bright area (leaving shadows black) or expose for the dark area (blowing out highlights).
WDR essentially expands the ‘exposure window’ of the camera to handle scenes that would defeat a standard sensor.
| Definition: WDR (Wide Dynamic Range) WDR (Wide Dynamic Range) is a camera feature that combines multiple exposures or uses specialised sensor processing to simultaneously capture detail in both bright highlights and dark shadows within a single frame. It is measured in decibels (dB) higher dB means greater dynamic range capability. |
Digital WDR vs True WDR — What’s the Difference?
| Feature | Digital WDR (DWDR) | True WDR (Hardware WDR) |
| How it works | Software-based tone mapping / gamma correction | Dual/multiple exposures captured by sensor hardware |
| Image quality | Moderate improvement | Significant improvement — up to 120dB+ |
| Latency impact | Low | Slightly higher processing time |
| Cost | Lower — often in budget cameras | Higher — professional/industrial grade |
| Best for | Mild contrast scenes | Extreme contrast: sunlight + shadow in same frame |
| Recommended use | Indoor low-contrast settings | Factory entrances, loading docks, outdoor yards |
| Noise handling | May amplify noise in dark areas | Better noise control with proper sensor design |
For most industrial applications, especially where safety and forensic quality matter, True WDR is the recommended standard. Digital WDR is acceptable for indoor offices or server rooms where lighting is controlled, but it simply isn’t powerful enough for the contrast extremes found on factory floors.
How to Tune WDR Settings for Industrial Environments
Knowing WDR exists is one thing. Tuning it correctly for your specific environment is where the real engineering skill comes in. Here is a step-by-step approach used by experienced system integrators.
Step 1 — Assess Your Scene’s Contrast Ratio
Before touching any setting, measure the actual brightness difference in your scene. Use a light meter or observe the live camera feed. If you see blown-out highlights (pure white areas) or crushed shadows (pure black areas) in the same frame, WDR is definitely needed.
Step 2 — Enable WDR and Set the Initial Level
Start with WDR set to a mid-range level (typically 50–60% or the ‘medium’ preset if your camera uses named levels). Observe the image for 2–3 minutes across different lighting conditions, especially during shift changes or when large machines start up (which can alter ambient light significantly).
Step 3 — Fine-Tune Based on Observations
- Highlights still blown out? → Increase WDR strength gradually.
- Image looks washed out or unnatural? → Reduce WDR strength.
- Shadows still crushed? → Check if the gain is too low separately from WDR.
- Motion appears ghosted or blurry? → Reduce WDR or increase shutter speed to compensate.
Step 4 — Combine WDR with Complementary Settings
WDR alone doesn’t solve everything. Pair it correctly with:
- • Anti-flicker mode: Match shutter to your power frequency (50Hz or 60Hz)
- • Day/Night mode: Auto switching prevents incorrect WDR application at night
- • Noise Reduction (2DNR/3DNR): Use 3D noise reduction in low-light WDR scenes
- • Exposure compensation: Fine-tune overall brightness after WDR is set
Step 5 — Validate with Recording Review
Don’t judge WDR quality from the live feed alone. Review recorded footage from the last 24 hours, focusing on peak contrast moments (early morning sunlight angles, night shift transitions, welding operations). Adjust accordingly.
| Pro Tip: The WDR-Motion Trade-off True WDR works by capturing two or more exposures rapidly and merging them. This process introduces a tiny lag between exposures, which can cause ghosting on fast-moving objects (like conveyor belt items or forklifts). If motion quality is critical, slightly reduce WDR strength and compensate with a faster shutter speed. On static or slow-moving scenes (perimeter walls, empty yards), push WDR higher for maximum dynamic range. |
WDR vs BLC vs HLC — Which Should You Use?
Many cameras offer three competing technologies for handling difficult lighting. Understanding the difference is critical for correct configuration.
| Technology | Full Name | How It Works | Best Industrial Use Case |
| WDR | Wide Dynamic Range | Multi-exposure capture + merge for full scene clarity | Loading docks, plant entrances, mixed sun/shadow areas |
| BLC | Backlight Compensation | Boosts exposure in a selected dark region, sacrificing highlights | Monitoring a person/machine in front of a bright window |
| HLC | Highlight Compensation | Masks or dims extremely bright spots (like headlights/arc welding) | Outdoor yards with vehicle headlights; welding areas |
The rule of thumb: Use WDR when the entire scene has mixed bright and dark areas. Use BLC when a specific foreground subject is backlit. Use HLC when isolated bright point sources (headlights, arc flashes) are blinding the camera. In some cases, combining HLC with WDR gives the best results in complex environments.
Real-World Use Cases: Industrial CCTV in Action
Factory Floor — Conveyor Lines and Machinery
Factory floors present a unique combination of challenges: overhead fluorescent or LED panels (often flickering), reflective metal machinery, moving components, and workers in high-visibility gear against dark backgrounds.
- Set shutter speed to anti-flicker mode matching your power frequency (1/100s for 50Hz, 1/120s for 60Hz)
- Enable True WDR at 60–70% machinery reflections are common
- Use 3D Noise Reduction to compensate for any gain increase in darker zones
- Point cameras at 45° angles to minimise direct reflection from metal surfaces
Warehouse — Loading Docks and Storage Bays
Warehouses are classic high-contrast environments. The loading dock opening is often 100x brighter than the interior storage area. Forklifts move fast, and license plate capture at entries is often required.
- Enable True WDR at the maximum appropriate level for entrance cameras.
- For license plate cameras at entry points, disable WDR and use HLC + fast shutter speed instead. WDR can ghost plate numbers on moving vehicles.
- Use BLC on cameras monitoring specific worker areas backlit by dock doors.
- Install supplemental IR or white-light illuminators in deep storage aisles.
Oil & Gas Plant — Outdoor and Refinery Areas
Oil and gas facilities demand cameras that work in extreme conditions: high-pressure sodium lighting, flare stacks, reflective tanks, outdoor exposure to sun and rain and strict safety requirements for footage quality.
- Use cameras rated for Zone 2 or Zone 1 hazardous areas, with full WDR capability
- Enable HLC for cameras near flare stacks. The intense flare light will blind standard cameras
- Use motorised varifocal lenses with auto-iris for flexible outdoor coverage
- Schedule day/night transitions carefully, oil plants often have mixed natural and artificial light at dawn/dusk
Outdoor Industrial Yards — Perimeter and Gate Monitoring
Outdoor yard cameras face sunlight, shadows under trees or structures, vehicle headlights at night and weather-induced lighting variability all in one field of view.
- Enable True WDR for perimeter cameras covering both lit and shaded zones
- Use HLC or Defog mode for cameras at gate entries where vehicles point headlights directly at the lens
- Set auto-gain with a ceiling of 18–24dB maximum to control nighttime noise
- Use cameras with starlight sensors or built-in IR for seamless day/night transitions
Conclusion: Smart Exposure Tuning Is Not Optional in Industrial Settings
Industrial environments will always push cameras to their limits. The mix of artificial light sources, extreme contrast, reflective surfaces, and fast-moving equipment creates conditions that no single camera setting can handle right out of the box.
The engineers and system integrators who master camera exposure basics, shutter speed, gain and aperture and pair them with correctly tuned WDR, BLC and HLC settings, are the ones delivering surveillance systems that actually work when it matters most.
Key Takeaways from This Guide
- Exposure control (shutter, gain, aperture) is the foundation; get these right before touching WDR.
- True WDR outperforms Digital WDR for genuine industrial high-contrast scenes.
- WDR, BLC, and HLC serve different purposes; understand which to use in each scenario.
- Anti-flicker shutter speed matching is non-negotiable in facilities with fluorescent or LED lighting.
- Quarterly exposure reviews prevent seasonal lighting changes from degrading footage quality.
- Pairing WDR with 3DNR noise reduction delivers the best results in mixed low-light, high-contrast environments.
The Future: AI-Powered Exposure and Smart WDR
The next generation of industrial cameras is moving beyond static WDR settings. AI-driven exposure optimisation systems can analyse scene content in real time, automatically adjusting dynamic range, gain and shutter speed based on what’s actually happening in the frame, not just ambient light levels.
Smart WDR algorithms are being trained on industrial scene datasets, allowing cameras to distinguish between a welding arc (requires HLC) and a sunlit window (requires WDR) and respond appropriately within milliseconds. Edge AI chipsets built into cameras enable this processing without cloud latency.
For system integrators specifying industrial CCTV solutions today, looking for cameras with AI-assisted exposure management will future-proof your installations against the increasingly complex lighting environments of smart factories and Industry 4.0 facilities.
Read Also: Why CCTV Installations Fail in Industrial Sites: Cabling, IR Reflection and Coverage Gaps
Read Also: NVR vs Edge Recording in Large-Scale Honeywell Surveillance Systems